Tuesday, December 8, 2015

Cleaning solutions that are safe for you and the envrionment


 After years of using chemical cleaners, I finally tried a couple of environmentally friendly cleaning products- and they work great!  Vinegar and baking soda! 

According to the Good Housekeeping Institute, straight 5% solution of vinegar (the kind you buy at the grocers) kills 99% of bacteria, 82% of molds, and 80 % of viruses.                                                                                              
  Kitchen and bathroom:

I use straight vinegar on counter tops, in sinks, and in and around toilets, to remove germs.  Used in conjunction with baking soda, making a paste, it works great on sinks and bathtubs removing soap scum. Baking soda with a little water used on counter tops removes stains, even red wine and tea, and it doesn’t take off the finish. (You’ll need to rinse it a couple of times as it’s a little gritty.)  A vinegar/ water solution in a spray bottle makes a great window/mirror cleaning solution, and mixing ½ cup vinegar in 1 gallon (4 liters) of water is good for washing lino or vinyl floors (¼ c to 1 gallon for ceramic tiles).

Straight vinegar works really well on chrome to make it shiny, on shower glass doors to remove hard water spots, and soaking the shower head in a bowl of vinegar will remove the lime and calcium deposits that clog the holes.  It takes a little longer than the advertised ‘lime removers’ but I would rather use a natural product than a chemical that is corrosive and takes the color out of my shirt (as I always manage to get some on it).
I agree that you still need to turn on the bathroom fan, as vinegar vapors can be pretty strong, but they do dissipate quite fast.
It’s a product that’s safe around children, still kills the germs and it’s is friendly to the air, water, and you! 

photos of products by: www.armandhammer.com and www.bobvila.com

Poisonous Ornamental Plants

Here’s a list of Poisonous Ornamental Plants
taken from: http://www1.agric.gov.ab.ca/$department/deptdocs.nsf/all/agdex13351
(including which part of the plant is toxic)

Autumn Crocus (all parts)
Black Nightshade (all parts)
Bleeding Heart (all parts)
 
 Braken Fern (all parts)
Castor Bean (seeds, foliage young seedlings)
Black Eyed Susan (all parts)
Daffodil (all parts, especially bulbs)
Delphinium (all parts, especially young plants and seeds)
Flowering Tobacco (all parts)
Foxglove (all parts)
Gas Plant (all parts, especially seed pods and plant juices )
Goldenrod (all parts)
Hyacinth (all parts can cause sickness, the bulb is most toxic)
Iris (leaves, rhizomes, plant juices)


Lily of the Valley (all parts)
Lobelia (all parts)
Lupine (all parts, especially seeds)
Monkshood (all parts, especially roots and seeds)
Morning Glory (seeds)
Pheasants Eye (all parts)
Poppy (all parts)
Sneezeweed (all parts)
Squill (all parts, especially bulb)
Sweet pea (perennial) (seeds)
Tansy (all parts)

Bleeding heart photo by: gardeningdirect.scene7.com
Iris photo by: prairiescapes.ca

Monday, November 30, 2015

Evergreen Trees and Shrubs for zone 3


Evergreen Trees  Zone 3 (with heights)
Larix siberica- Larch (30m )                                       
Picea glauca –White Spruce (15m)
Picea glauca ‘Densata’ –Black Hills Spruce (6m)
Picea pungens- Colorado Spruce (15m)
Picea pungens ‘Fat Albert’ (10m)
Picea pungens ‘Glauca’- Colorado Blue Spruce(15-20m)


Picea pungens ‘Glauca Globosa’ –Blue Globe Spruce (2m) 
Pinus contorta latifolia – Lodge Pole Pine (10m)
Pinus aristata- Bristlecone Pine (13m)
Pinus ponderosa- Ponderosa Pine (10 -12m)
Pinus sylvestris- Scot’s Pine (13m)
Pinus cembra- Swiss Stone Pine (4m-slow)
Thuja occidentalis ‘Brandon’- Brandon Cedar ( 4m)                                      

Evergreen Shrubs  Zone 3 (with heights and spread)
Arctostaphylos uva-ursi- Bearberry (.15m, 60-120 cm wide)
Juniperus chinensis ‘aurea’- Gold Coast Juniper (.75m tall, 1.5m wide-  golden/green)
Juniperus horizontalis ‘Blue Chip’-Blue Chip Juniper (.2m tall, 2.5m wide- silver blue)
Juniperus horizontalis ‘Youngstown’-Youngstown Andorra Juniper
(.3m tall, 1.75m wide-green)
Juniperus horizontalis ‘Wiltonii’ –Blue Rug Juniper (.15m tall, 2m wide-silver blue)
Juniperus horizontalis ‘Prince of Wales’- Prince of Wales Juniper
(.2m tall, 2.5m wide-bright green)
Juniperus sabina ‘Calgary Carpet’- Calgary Carpet Juniper (.3m tall, 1.5m
                                  wide-soft green)
Juniperus sabina ‘Monard’- Moor -dense Juniper (.3m tall, 1.5m wide- bright green)
Juniperus sabina ‘Scandia’ – Skandia Juniper (.5m tall, 2m wide-bright green)
Juniperus scopulorum ‘Medora’- Medora Juniper (3m tall, 1m wide-blue green)
Juniperus scopulorum ‘Moonglow’- Moonglow juniper (5m tall, 2m             wide-blue)
Juniperus scopulorum ‘Wichita Blue’-Wichita Blue Juniper (4m tall, 1.5m wide-silver blue)
Juniperus squamata ‘Blue Star’- Blue Star Juniper (.6m tall, 1.25m wide-silver blue)
Juniperus virginiana ‘Skyrocket’- Skyrocket Juniper (5m tall, 1m wide-blue green)
Microbiota decussate- Russian Cypress (.15m tall, 2m wide)
Picea abies ‘Little Gem’-Little Gem Spruce (.5m)
Picea abies ‘Nidiformis’- Nest Spruce ( 1m)
Pinus mugo ‘Mops’- Mops Mugo Pine (.6m)
Pinus mugo ‘Pumilo’ – Dwarf Mugo Pine ( 1.25m)
Thuja occidentalis ‘Little Giant’ – Little Giant Cedar (1m tall, 1m wide)
Thuja occidentalis ‘Woodwardii’- Globe Cedar ( 1.75m tall, 1.75 m wide)

Photos:Colorado Spruce by:www.lawyernursery.com
Lodgepole Pine by:www.prairiescapes.ca
Calagery Carpet Juniper by:www.greentreelandscapes.com


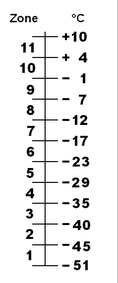
Plant Hardiness Zones for Alberta

When deciding which plants will survive in your location, it’s helpful to know your planting zone. Most seed catalogues and nurseries identify what zone the plant is designated for. If you have a sheltered area from the wind and temperatures, the zone number will most likely increase.
 

Below is the list of low temps per zone. A zone 3 plant should endure winter temperatures to -40°C

Monday, November 9, 2015

Thatch in your lawn- what it is and how to control it.


Thatch is not leaves, but a layer of dead and decaying tissue found between the soil and the green blades.  It is a problem when it becomes thicker than 1/2” because it increases the probability of disease and pest problems. As the thatch layer thickens, the grass roots and rhizomes grow here instead of in the deeper soil region. This makes the grass more susceptible to drought and injury stress. It is best removed in the spring or fall while the grass is actively growing, and when weather is forecasted to have favourable conditions (not too hot or dry). It takes about 30 days for the turf to recover.

Prior to thatch removal, mow the grass closely and remove clippings and debris.  Thatch can be removed by hand or power raking.


You can manage it by:
  • regular mowing. The clippings can then be left on the lawn if they are not too long
  • deep but infrequent watering. This lets the oxygen down into the soil and encourages deeper roots
  • using pesticides only as needed as they kill the microbes that break down the thatch
  • avoiding excess fertilization as there is then more growth than can be controlled.
 Some cultivars of grass are prone to producing thatch faster than others. Having a balanced blend of grasses, suitable to the area, will help reduce the accumulation of thatch.


Photo of hand raking by:amazon.com
Photo of power raking by:www.safelawns.org

Tuesday, November 3, 2015

Mulches for your garden beds- organic, inorganic and living mulches


Mulch offers many advantages to a planting bed.  It conserves moisture, insulates the soil from temperature extremes, reduces weed germination (or at least makes it easier to pull them out), adds aesthetic appeal in color and texture variance, promotes good soil texture without compaction, eliminates cultivating around the base of plants where roots might be damaged, and prevents rain splash on plants.

Mulches work by eliminating light from weeds; therefore, the thickness needs to be about 3” thick.
There are 2 kinds of non living mulches:

  1. Organic - made from plants.  Examples are shredded or chipped bark, lawn clippings, and pine cones.  Many of these will decompose as they age but this adds nutrients and texture to the soil. 
  2. Inorganic - Examples are rock and gravel, manufactured pellets from tires, plastic sheeting and landscape fabric. 
Installation: Remove all perennial weeds including thick rootstocks.  Place edging around the bed to hold the materials in place. 

For organic mulches, apply bark chips 2-4” thick onto the prepared ground. Bark mulch can be stirred up every 4 months to freshen its look, but should be topped once a year with new mulch If you’re using lawn clippings, apply in thinner layers, as they become slimy if too thick.

For inorganic mulches  landscape fabric should be applied under the mulch. This way the mulch will not be 'absorbed' into the ground. When spreading more than a width of fabric, there needs to be a 6" overlap. You can use sod staples (metal U shaped pins) to secure the overlaps, especially on slopes. Try to fit the fabric under the edging materials. For trees, shrubs and perennials, lay fabric down, and cut an X in the fabric and install plants. Keep the fabric and the mulch a few inches away from the base and crowns of your shrubs and perennials, to ensure the roots receive moisture and air, and to prevent rodents and pest damage. There are different thicknesses of fabric, which affects its strength and durability. The thicker it is, the better the barrier.
By using different colors, sizes, or types of rock, you can  vary  the  design or effect you want. 
Living mulches 
Plants that spread to cover the ground offer a barrier which prevents weeds from becoming 
established.
They need to be selected for the site conditions and be of the three “L’s”- low growing, leafy and lush.  Be advised that some plants may become invasive.  Try to choose plants that are low maintenance and attractive.  Some examples of these are thyme, junipers, snow-in-summer, bearberry, bird’s foot trefoil, and goutweed. 

Try using mulches in your planting beds...you'll be pleasantly surprised with the results!!
 
  snow in summer photo by: www.birdsandblooms.com 

  other photos by: Prairie Scapes